landscape
Active member
- Joined
- Jan 14, 2007
- Messages
- 84
- Reason
- CALS
- Diagnosis
- 07/2006
- Country
- CA
- State
- Western Provinces
- City
- Erehwon
For anyone who wants to construct a home made collar.
Cervical collar
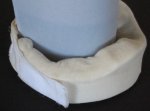
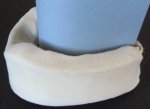
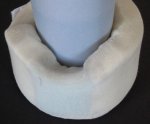
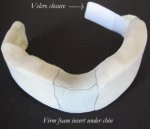
(There should be 5 photos with these instructions)
What you need for a medium to small collar:
24” by 4” of 1 ½ ” or 1 ¾ “ thick foam
4” by 4” piece of dense (firm) foam (Density of 'M70')
About 6” of 2” wide webbing
About 4” of 2” wide velcro (hook and loop)
Very fine rib stretchy fabric (I have bought it as a tubular knit) to cover the collar. Thus it should be close to skin tone. I don’t like the hospital type of cotton stockinette as it is rough on the skin.
Sharp electric carving knife to sculpt foam
A sturdy sewing machine and some ‘Denim’ size needles (i.e. needles that will sew jeans)
Household ‘Goop’ to bond foam. Caution: This material leaves a hard edge where you bond the layers together. The type of glue they use in the mattress factory does not leave a hard edge but it does not hold the layers together as well as ‘Goop’ does. I just don’t take it right to the edge.
Procedure
1. Measure the neck. Decide where you want the closure of the collar to be. It does not have to be at the back of the neck, it can be at the side. Which hand is strongest? The closure can be on that side. Is there a tilt to the head? Adjust the pattern to your needs.
The foam should not overlap at the closure, the webbing will form the overlap.
2. Draw a pattern on paper, using the plan photo of the collar as a general guide. You can make the cut out for the ears later. Let the lower line of the collar dip down in the front.
3. Cut out paper and fit on the neck. Decide whether you have the proportions right. Is the chin well cupped, are the ears free (especially for those who wear hearing aids!), do the two ends meet but not overlap? You will have to guess a good deal as the paper will not fit as the foam does.
4. Cut out the shape from the regular foam. Trim the edges that will be next to the wearer so that it curves gently to the body.
5. With a box cutter or similar cut out some ¼ inch V-shaped sections (in a vertical direction) on the INSIDE of the collar. This is to encourage the collar to take on a curved shape rather than be just a flat piece of foam. It’s like making darts in a skirt or pair of pants to make them fit around the waist.
Thin down the ends of the collar where you will sew the velcro onto both cover and foam. This makes it easier to sew.
6. If you don’t want to insert a firm piece of foam under the collar you are now ready to cover the collar. If you want to make the portion under the chin firmer follow the directions below.
6a To insert a firm piece of foam under the chin first outline the portion that you wish to replace with a felt pen. Shape it like a keystone in an arch, wider at the top and narrow at the bottom. Angle the sides so that the outer portion is wider than the inner as this helps to form the curve of the collar.
6b Cut the same shape from firmer foam. Apply ‘Goop’ as directed but don’t go right to the edges. Allow to dry in the shape of the collar by tying something around the foam.
You can cut some V-shaped slits in this section too in order to encourage it to curve
Covering the collar
7. Cut out washable knit fabric (polyester works well) about 6 inches longer than the foam and also narrower. You want to fabric to stretch around the collar (I’m talking about the chin to chest direction) in a smooth fashion, no wrinkles. Leave yourself enough to make a seam so that you have a long tube.
8. Stuff the collar into the fabric tube.
9. Decide where you will put the hook velcro and where you will put the loop. It depends on hand dexterity, preference etc.
10. Tuck the ends of the cover in and sew the velcro onto cover and foam. This is the hard part. You may find covering the velcro with some tissue (which you can rip off afterwards) makes the sewing easier.
11. Form the other end of the cover into a neat triangle and attach a piece of webbing.
12. Sew velcro to webbing.
Finito!
Washing collar: sponge it off and dry it with a hair dryer.
Cervical collar
(There should be 5 photos with these instructions)
What you need for a medium to small collar:
24” by 4” of 1 ½ ” or 1 ¾ “ thick foam
4” by 4” piece of dense (firm) foam (Density of 'M70')
About 6” of 2” wide webbing
About 4” of 2” wide velcro (hook and loop)
Very fine rib stretchy fabric (I have bought it as a tubular knit) to cover the collar. Thus it should be close to skin tone. I don’t like the hospital type of cotton stockinette as it is rough on the skin.
Sharp electric carving knife to sculpt foam
A sturdy sewing machine and some ‘Denim’ size needles (i.e. needles that will sew jeans)
Household ‘Goop’ to bond foam. Caution: This material leaves a hard edge where you bond the layers together. The type of glue they use in the mattress factory does not leave a hard edge but it does not hold the layers together as well as ‘Goop’ does. I just don’t take it right to the edge.
Procedure
1. Measure the neck. Decide where you want the closure of the collar to be. It does not have to be at the back of the neck, it can be at the side. Which hand is strongest? The closure can be on that side. Is there a tilt to the head? Adjust the pattern to your needs.
The foam should not overlap at the closure, the webbing will form the overlap.
2. Draw a pattern on paper, using the plan photo of the collar as a general guide. You can make the cut out for the ears later. Let the lower line of the collar dip down in the front.
3. Cut out paper and fit on the neck. Decide whether you have the proportions right. Is the chin well cupped, are the ears free (especially for those who wear hearing aids!), do the two ends meet but not overlap? You will have to guess a good deal as the paper will not fit as the foam does.
4. Cut out the shape from the regular foam. Trim the edges that will be next to the wearer so that it curves gently to the body.
5. With a box cutter or similar cut out some ¼ inch V-shaped sections (in a vertical direction) on the INSIDE of the collar. This is to encourage the collar to take on a curved shape rather than be just a flat piece of foam. It’s like making darts in a skirt or pair of pants to make them fit around the waist.
Thin down the ends of the collar where you will sew the velcro onto both cover and foam. This makes it easier to sew.
6. If you don’t want to insert a firm piece of foam under the collar you are now ready to cover the collar. If you want to make the portion under the chin firmer follow the directions below.
6a To insert a firm piece of foam under the chin first outline the portion that you wish to replace with a felt pen. Shape it like a keystone in an arch, wider at the top and narrow at the bottom. Angle the sides so that the outer portion is wider than the inner as this helps to form the curve of the collar.
6b Cut the same shape from firmer foam. Apply ‘Goop’ as directed but don’t go right to the edges. Allow to dry in the shape of the collar by tying something around the foam.
You can cut some V-shaped slits in this section too in order to encourage it to curve
Covering the collar
7. Cut out washable knit fabric (polyester works well) about 6 inches longer than the foam and also narrower. You want to fabric to stretch around the collar (I’m talking about the chin to chest direction) in a smooth fashion, no wrinkles. Leave yourself enough to make a seam so that you have a long tube.
8. Stuff the collar into the fabric tube.
9. Decide where you will put the hook velcro and where you will put the loop. It depends on hand dexterity, preference etc.
10. Tuck the ends of the cover in and sew the velcro onto cover and foam. This is the hard part. You may find covering the velcro with some tissue (which you can rip off afterwards) makes the sewing easier.
11. Form the other end of the cover into a neat triangle and attach a piece of webbing.
12. Sew velcro to webbing.
Finito!
Washing collar: sponge it off and dry it with a hair dryer.